

Chocolate shavings transform ordinary desserts into elegant, restaurant-quality presentations that captivate guests visually before they even taste your creation. Mastering how to shave chocolate for garnish elevates your dessert game dramatically, allowing you to add professional finishing touches to cakes, cupcakes, hot beverages, ice cream, and plated desserts with minimal effort and maximum visual impact. Homemade chocolate shavings offer superior freshness, customization possibilities, and authentic artisanal quality that pre-packaged alternatives simply cannot match—plus you control the size, style, and chocolate quality to perfectly complement your specific dessert. This comprehensive guide explores five proven methods for shaving chocolate, from beginner-friendly techniques using common kitchen tools to advanced professional methods that create show-stopping chocolate curls and delicate shavings worthy of fine dining establishments. Whether you're preparing an intimate dinner party dessert, decorating a celebration cake, or simply wanting to elevate your everyday hot chocolate, these chocolate shaving techniques will transform you into a confident chocolate artisan.
Understanding Chocolate Temperature for Shaving
Temperature control is absolutely fundamental when learning how to shave chocolate for garnish—it's the single most important factor determining success or frustration. Chocolate's unique crystalline structure responds dramatically to temperature changes, making it either perfectly cooperative or impossibly difficult to work with based on just a few degrees' difference.
The Temperature Sweet Spot: The ideal temperature range for shaving chocolate falls between 65-68°F (18-20°C). At this temperature, chocolate maintains enough structural integrity to hold shape while being pliable enough to curl rather than shatter. Chocolate that's too cold becomes brittle and breaks into useless fragments instead of forming elegant shavings. Conversely, chocolate that's too warm becomes soft and sticky, smearing across tools rather than creating distinct curls or shavings.
Testing Chocolate Readiness: Before attempting to create chocolate shavings, test your chocolate's temperature by lightly touching it with your fingertip. It should feel cool but not cold, and should not leave visible fingerprints or show melting. If the chocolate feels hard as a rock, it needs to warm slightly—hold the bar in your hands for 30-60 seconds or let it sit at room temperature longer. If it feels soft or shows any sign of melting, refrigerate for 5-10 minutes before trying again.
Environmental Factors: Your kitchen's ambient temperature significantly impacts results when learning how to shave chocolate for garnish. Working in air-conditioned spaces (68-72°F) provides ideal conditions. During warm weather or in hot kitchens, you'll need to refrigerate chocolate more frequently between shaving sessions. Conversely, in very cold environments, chocolate may need gentle warming before achieving workable texture.
|
Chocolate Type |
Ideal Shaving Temperature |
Characteristics |
|
Dark chocolate (60-70% cacao) |
65-68°F |
Most forgiving; holds shape well; creates firm curls |
|
Milk chocolate |
64-66°F |
Slightly softer; requires cooler temperature; sweeter flavor |
|
White chocolate |
62-65°F |
Most temperature-sensitive; needs coolest conditions; delicate handling |
Pro Temperature Management: Professional chocolatiers often work with chocolate blocks stored at precise temperatures in climate-controlled environments. Home cooks can achieve similar control by refrigerating chocolate for exactly 10 minutes before beginning, then working quickly to create shavings before the chocolate warms from room temperature and hand heat.
Essential Tools for Shaving Chocolate
Success in making chocolate shavings depends heavily on having appropriate tools that make the process efficient and produce consistent, professional results. While specialized equipment certainly helps, several common kitchen tools work remarkably well for creating beautiful chocolate garnish.
Vegetable Peeler: The most accessible and versatile tool for shaving chocolate, standard Y-shaped or straight vegetable peelers create beautiful curls with minimal learning curve. Look for sharp, high-quality peelers with comfortable grips that allow precise control. The blade sharpness directly impacts results—dull peelers produce crumbly, broken shavings while sharp blades create smooth, elegant curls.
Box Grater and Microplane: These tools excel at creating fine chocolate shavings ranging from powder-like consistency to small chips. Box graters offer multiple hole sizes for texture variety, while microplanes produce ultra-fine shavings perfect for delicate dustings. Both require minimal pressure and work best with slightly colder chocolate than curl-making techniques.
Cheese Planer: Often overlooked, cheese planers create remarkably uniform, thin chocolate shavings that work beautifully for covering cake surfaces or creating layered effects. The fixed blade angle removes guesswork, producing consistent results even for beginners learning how to shave chocolate for garnish.
|
Tool |
Best For |
Skill Level |
Shaving Style |
Cost |
|
Vegetable peeler |
Medium to large curls |
Beginner |
Versatile |
$ |
|
Box grater |
Chunky pieces, varied sizes |
Beginner |
Rustic |
$ |
|
Microplane |
Fine powder, delicate dusting |
Beginner |
Elegant |
$$ |
|
Cheese planer |
Thin, uniform shavings |
Intermediate |
Professional |
$ |
|
Bench scraper |
Large dramatic curls |
Advanced |
Show-stopping |
$$ |
|
Specialized chocolate shavers |
Professional consistency |
Intermediate |
Precise |
$$$ |
Additional helpful tools include parchment paper for catching shavings, clean kitchen towels for handling chocolate without warming it with bare hands, and airtight containers for storing finished shavings. Investing in quality pastry baking tools ensures better results and longer tool life compared to bargain alternatives that dull quickly.

Choosing the Right Chocolate for Shaving
Not all chocolate works equally well for shaving chocolate. The chocolate's composition, size, and quality dramatically affect results.
Bar vs. Block: Thick chocolate bars (at least 1/2-inch thick) or blocks provide the best surface area for creating curls. Standard thin bars work for grated shavings but create only small curls. Avoid chocolate chips entirely—their stabilizers prevent proper curl formation.
Quality Matters: Premium fine chocolate with higher cocoa butter content (32-39%) produces smoother, more lustrous chocolate shavings that hold shape better. Couverture chocolate works ideally for professional results.
Chocolate Type Selection:
- Dark chocolate (60-70%): Most forgiving; holds shape reliably; sophisticated flavor
- Milk chocolate: Requires cooler temperatures; sweeter taste; softer texture
- White chocolate: Most challenging; temperature-sensitive; stunning visual contrast
Optimal Size: Start with blocks measuring at least 3x3 inches and 1/2-inch thick for better control and longer, more dramatic curls. Browse quality chocolate options designed for professional pastry work.

How to Shave Chocolate for Garnish: 5 methods
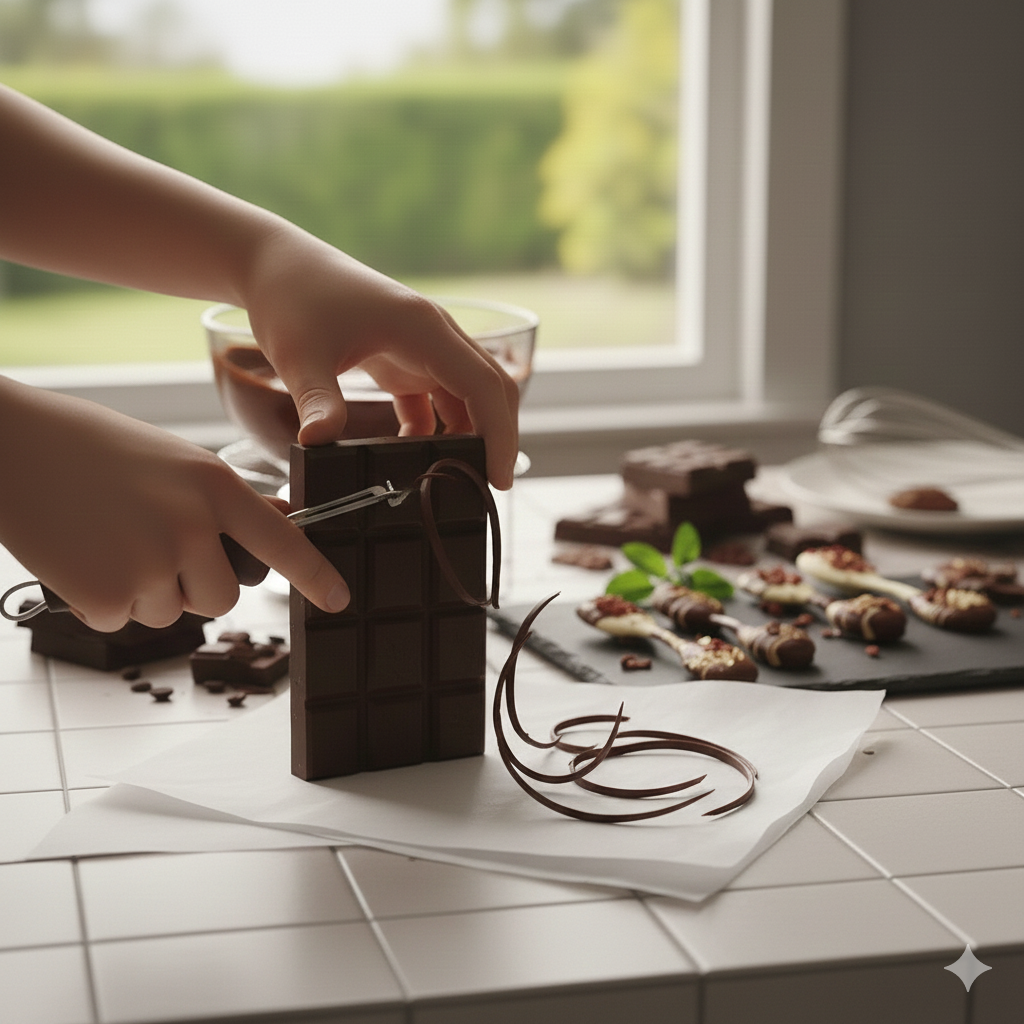
Method 1: Using a Vegetable Peeler
The most popular technique for how to shave chocolate for garnish, producing elegant chocolate curls with minimal practice.
Basic Technique: Hold chocolate wrapped in a towel with your non-dominant hand. Position a sharp vegetable peeler at a 20-30 degree angle against the flat side. Apply firm, steady pressure and draw toward you in one smooth motion. The chocolate should curl naturally as it peels away.
Controlling Curl Size:
- Tight curls: Use cooler chocolate (62-64°F), firmer pressure, steeper angle
- Loose curls: Use warmer chocolate (66-68°F), lighter pressure, shallower angle
Troubleshooting:
|
Problem |
Cause |
Solution |
|
Crumbles into powder |
Too cold |
Warm by holding 30-60 seconds |
|
Smears without curling |
Too warm |
Refrigerate 5-10 minutes |
|
Curls break immediately |
Dull blade or low-quality chocolate |
Sharpen peeler or use premium chocolate |
Pro Tips: Work over parchment paper. Use toothpicks to transfer delicate curls—never use fingers. Create multiple curls quickly before chocolate warms, then refrigerate the block briefly before continuing.
Method 2: Box Grater Technique
Box graters create versatile chocolate shavings ranging from chunky pieces to fine shreds, perfect for rustic presentations or complete cake coverage.
When to Use: Ideal for covering cake sides completely, topping hot beverages, or creating textured "snow" effects. This technique produces casual, approachable chocolate shavings perfect for family-style desserts.
Technique: Hold chocolate at a 45-degree angle against the grater. Use long, steady strokes with moderate pressure. Work quickly—friction generates heat. Rotate the block periodically for even results. If chocolate sticks, refrigerate both chocolate and grater for 5-10 minutes.
Hole Size Selection:
- Large holes: Substantial chips for visible texture
- Medium holes: Standard shreds for general garnishing
- Small holes: Fine shavings approaching powder consistency
- Rasping side: Dust-like results similar to microplane
Method 3: Microplane for Fine Shavings
Microplanes create delicate, powder-fine chocolate shavings that add sophisticated finishing touches to elegant desserts.
Best Uses: Delicate dustings over panna cotta, cheesecake, white chocolate mousse, or vanilla ice cream. Also perfect for cappuccinos and lattes where fine texture partially dissolves into foam while creating attractive patterns.
Technique: Use chocolate slightly colder (60-63°F). Hold chocolate firmly with a towel. Draw the microplane across the chocolate surface using light, quick strokes—like filing fingernails. Light pressure prevents clogging the fine teeth.
Maintenance: Tap microplane against work surface periodically to dislodge accumulated chocolate. Use a dry pastry brush for stubborn buildup. Never rinse with water while working.
Method 4: Cheese Planer Method
Cheese planers create remarkably uniform, thin chocolate shavings with professional consistency, making this tool particularly beginner-friendly.
How It Works: The fixed blade automatically cuts uniform thickness with every pass, removing guesswork. This produces thin, flat shavings rather than curled pieces—ideal for covering surfaces where irregular sizes would create uneven appearance.
Optimal Temperature: Work with chocolate at 64-66°F—slightly cooler than curl-making temperature. Hold chocolate firmly and pull the planer toward you with steady, even pressure.
Comparison to Peelers: While peelers create dramatic three-dimensional curls, cheese planers produce flatter, more uniform shavings that excel at covering cake sides smoothly or creating layered effects with consistent appearance.
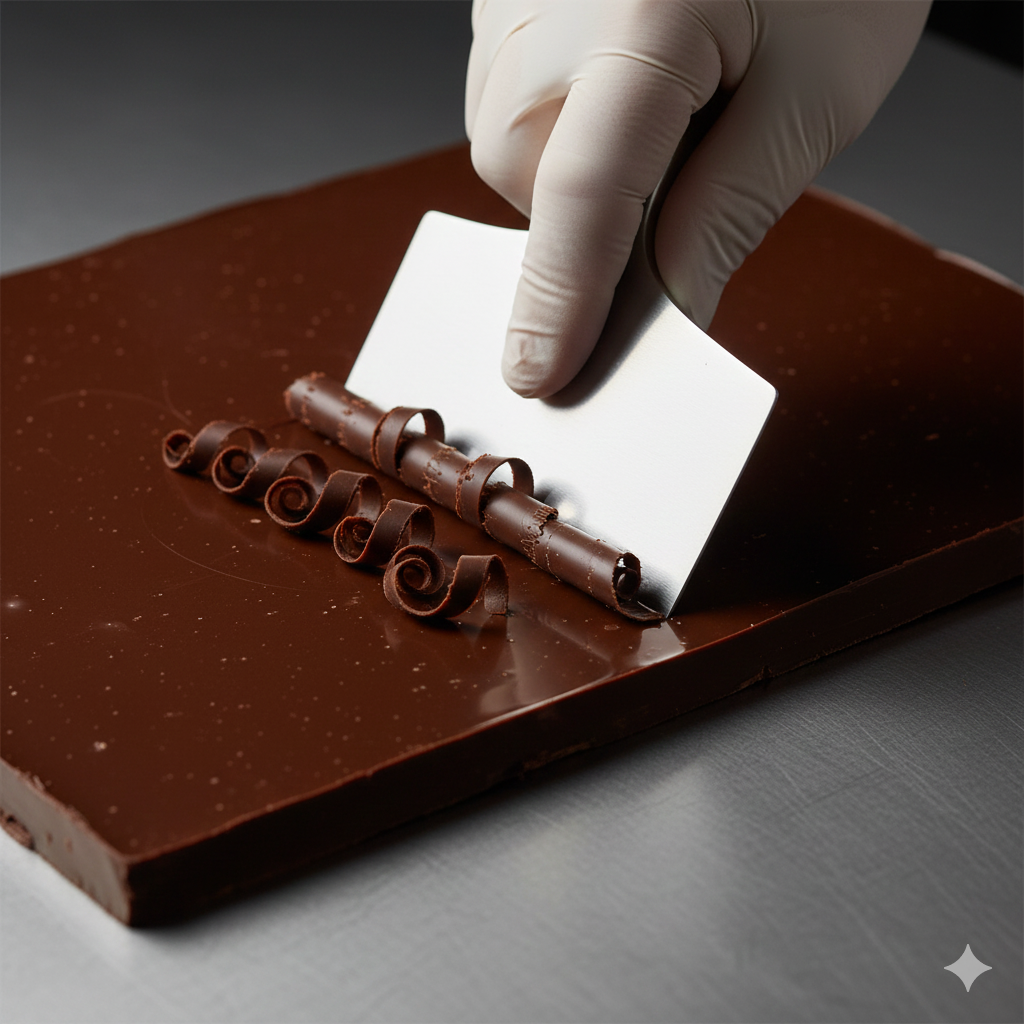
Method 5: Bench Scraper or Knife Technique
This advanced method creates impressive, oversized chocolate curls that make showstopping centerpieces when mastering how to shave chocolate for garnish.
Professional Process: Melt quality chocolate to 90-95°F. Pour onto a marble slab or cool baking sheet back. Spread into thin, even layer (1/8-inch thick) using an offset spatula. Allow to set until it loses shine but feels slightly tacky (5-10 minutes).
Scraping Technique: Hold bench scraper at 45-degree angle against chocolate. Apply firm, steady pressure and push across in one smooth motion. Chocolate should curl upward naturally, rolling into elegant cylinders measuring 6-8 inches long.
Critical Timing: Success requires catching chocolate at exactly the right moment. Test readiness by touching a corner lightly—should feel cool and slightly tacky but not wet. If timing is missed, gently rewarm with hairdryer on low or scrape up, re-melt, and try again.
When to Use: Reserve for special occasions where presentation justifies extra effort—wedding cakes, milestone birthdays, elegant dinner parties. The dramatic size creates "wow factor" that simpler methods cannot match.
For those serious about making chocolate shavings professionally, this technique is worth mastering. The results showcase true pastry artistry and transform simple cakes into competition-worthy creations. Explore professional chocolate decorations supplies to support advanced techniques.

Creating Different Shaving Styles
Understanding how to manipulate variables when learning how to shave chocolate for garnish allows creating diverse styles for different desserts.
Style Variations:
|
Style |
Temperature |
Pressure |
Tool Angle |
Best Use |
|
Tight curls |
62-64°F |
Firm |
35-45° |
Elegant plating, formal cakes |
|
Loose curls |
66-68°F |
Light |
15-25° |
Rustic desserts, bold presence |
|
Fine powder |
60-62°F |
Light |
N/A |
Sophisticated dusting, smooth desserts |
|
Chunky shavings |
64-66°F |
Moderate |
N/A |
Ice cream, casual desserts |
Mixed Chocolate Effects: Layer dark, milk, and white chocolate shavings for sophisticated color contrast. Create depth by applying darker shavings first, then lighter colors on top, or alternate colors in striped patterns.
Explore chocolate decorations and cake pastry decorations for complementary garnishing elements.
Storage and Handling of Chocolate Shavings
Properly storing chocolate shavings ensures they remain pristine until needed when learning how to shave chocolate for garnish.
Storage Guidelines:
- Use rigid, airtight containers between parchment paper layers
- Maintain 60-65°F with low humidity (below 50%)
- Store in cool, dry pantries away from heat sources
- Tempered curls last 2-3 weeks; untempered shavings use within one week
- Fine gratings have shorter life (3-5 days) due to greater surface exposure
Preventing Issues: Maintain consistent temperature to prevent bloom (white streaks). Never store near strong-smelling foods—chocolate absorbs odors. Handle delicate curls with toothpicks or spatulas, never fingers.
Delicate Curl Care: Place large curls in single layers with crumpled paper towels filling empty spaces. Transport carefully—gentle jostling breaks fragile pieces. Make 20-30% extra as insurance.
Creative Applications for Chocolate Shavings
Understanding diverse applications for chocolate shavings maximizes your investment in learning how to shave chocolate for garnish, allowing you to enhance numerous desserts with minimal additional effort.
Decorating Cakes and Cupcakes: Press chocolate shavings gently onto freshly frosted cake sides for complete coverage that disguises imperfect frosting while adding texture and elegance. Create borders around cake bases or tops by arranging uniform curls in overlapping patterns. Top cupcakes with small curls or fine shavings just before serving—adding too early causes shavings to absorb moisture from frosting and lose their distinct appearance.
Topping Hot Beverages: Transform ordinary hot chocolate, coffee, or lattes into café-quality beverages by garnishing with freshly shaved chocolate. Use fine microplane chocolate shavings that partially melt into foam while creating attractive patterns, or add small curls that soften gradually as guests sip. This simple garnish elevates everyday drinks to special treat status with mere seconds of effort.
Garnishing Frozen Desserts: Chocolate garnish works beautifully on ice cream, gelato, frozen yogurt, and semifreddo. Apply shavings immediately before serving to prevent them from freezing hard onto cold surfaces. The temperature contrast between cold desserts and room-temperature shavings creates interesting textural experience. Create dramatic presentations by inserting large curls vertically into scoops of ice cream for height and movement.
Finishing Mousses and Puddings: Delicate desserts like chocolate mousse, butterscotch pudding, or panna cotta benefit from light dustings of fine chocolate shavings that add subtle chocolate accent without overwhelming base flavors. Use white chocolate shavings on dark mousses or dark shavings on vanilla-based desserts for striking visual contrast. Apply just before serving to maintain shavings' distinct texture rather than having them dissolve into desserts.
Professional Plating Techniques: Use chocolate shavings as key plating elements in fine dining presentations. Scatter small shavings artistically around desserts on plates, create chocolate "paths" leading to central dessert elements, or build height by stacking curls architecturally. Professional pastry chefs often combine multiple shaving styles—powder dusting as base, medium pieces for texture, dramatic large curls as focal points—creating sophisticated multi-dimensional presentations.
Creating Chocolate "Snow" Effects: Achieve elegant winter-themed presentations by covering desserts, serving platters, or entire tablescapes with fine chocolate shavings resembling freshly fallen snow. Use microplanes to create powder-fine consistency, then dust liberally over items using fine-mesh sieves for even distribution. This technique works beautifully for holiday desserts, winter wedding cakes, or any occasion where magical, ethereal presentation enhances the experience.
|
Dessert Type |
Best Shaving Style |
Application Timing |
Pro Tip |
|
Layer cakes |
Medium to large curls |
Just before serving |
Press gently into soft frosting |
|
Cupcakes |
Small curls or fine shavings |
Within 2 hours of serving |
Center placement for focus |
|
Hot beverages |
Microplane powder or tiny curls |
Immediately before serving |
Use contrasting chocolate color |
|
Ice cream/gelato |
Any size, mixed textures |
At service time |
Add vertically for height |
|
Mousse/pudding |
Fine powder or small pieces |
Last minute |
Light dusting prevents dissolving |
|
Plated desserts |
Mixed sizes for dimension |
During final plating |
Combine with other garnishes |
Discover additional professional garnishing supplies at Zucchero Canada to complement your chocolate shaving techniques and create complete, cohesive dessert presentations.
Common Mistakes and Solutions
Understanding frequent pitfalls when learning how to shave chocolate for garnish helps you troubleshoot problems quickly and achieve consistent success with making chocolate shavings.
|
Problem |
Cause |
Solution |
Prevention |
|
Chocolate crumbles/breaks instead of curling |
Chocolate too cold; dull tools |
Warm chocolate by holding 30-60 seconds; sharpen or replace tools |
Check temperature before starting; maintain sharp tools |
|
Chocolate melts/smears instead of curling |
Chocolate too warm; excessive hand heat |
Refrigerate chocolate 5-10 minutes; use towel barrier |
Work in cool environment; handle chocolate minimally |
|
Uneven shaving thickness |
Inconsistent pressure; rushing the process |
Practice steady, even strokes; slow down movements |
Focus on technique over speed |
|
Chocolate sticks to tools |
Wrong temperature; tool needs cleaning |
Cool chocolate slightly; clean and dry tools thoroughly |
Maintain proper temperature range |
|
Shavings melt from body heat |
Handling with warm hands |
Use toothpicks or spatulas for transfer; wear clean cotton gloves |
Minimize direct contact with finished shavings |
|
Delicate curls break during transfer |
Overly fragile curls; rough handling |
Create slightly thicker curls; use extreme gentleness |
Make extras as backups for important events |
|
Dull, cloudy appearance |
Chocolate bloom; old chocolate; poor quality |
Use fresh, high-quality chocolate; store properly |
Control storage temperature and humidity |
|
Curls won't stay on cake |
Adding to cold frosting; wrong timing |
Apply to room-temperature frosting; add just before serving |
Time application appropriately |
Key Insight: Temperature issues cause 80% of beginner frustrations. The sweet spot spans only 5-6 degrees Fahrenheit. Consider an infrared thermometer for precise measurement until you develop intuitive feel.
Conclusion
Mastering how to shave chocolate for garnish empowers you to transform everyday desserts into professionally stunning creations worthy of special occasions, fine dining establishments, or simply everyday indulgence that feels extraordinarily special. From simple vegetable peeler chocolate curls that beginners perfect quickly to advanced bench scraper techniques producing dramatic showpieces, these five methods provide comprehensive garnishing capabilities for any situation or skill level. The secret to consistent success lies in understanding chocolate's temperature-sensitive nature, selecting appropriate tools for desired effects, choosing quality chocolate that works reliably, and practicing techniques before important applications. Whether garnishing celebration cakes, elevating plated desserts, finishing hot beverages, or adding elegant touches to frozen treats, chocolate shavings deliver maximum visual impact with minimal effort once you understand fundamental principles. With proper storage, these beautiful garnishes can be prepared days ahead, reducing event-day stress while ensuring flawless presentations. The versatility of shaving chocolate techniques—from powder-fine dustings to architectural curls—means you'll find applications for these skills across your entire dessert repertoire. Remember that practice builds confidence and consistency, so embrace imperfect early attempts knowing that even professionals create backup garnishes expecting some breakage. Ready to create bakery-quality chocolate garnish that amazes guests and elevates every dessert? Explore premium chocolate, professional pastry tools, and complete garnishing supplies at Zucchero Canada to support your journey toward chocolate artistry that transforms simple desserts into unforgettable culinary experiences.
References
Callebaut. (2023). Chocolate handling and garnishing techniques for professionals. Barry Callebaut Group.
Figoni, P. (2022). How baking works: Exploring the fundamentals of baking science (4th ed.). Wiley.
Greweling, P. (2023). Chocolates and confections: Formula, theory, and technique for the artisan confectioner (3rd ed.). Wiley.
Suas, M. (2022). Advanced bread and pastry: A professional approach (2nd ed.). Cengage Learning.


Leave a comment
All comments are moderated before being published.
This site is protected by hCaptcha and the hCaptcha Privacy Policy and Terms of Service apply.